![]()
Circle / Strip Accessory
for the ScoreOneEGlass Cutter
User Guide
Thank you for buying this Inland product. Please read all the instructions before operating this or any machine.
Safety
It is extremely important to wear proper eye protection when using any glass cutter. We highly recommend that you wear safety goggles rather than safety glasses.
Set your ScoreOneEup on a sturdy, level work surface at a comfortable working height.
Parts |
|
|
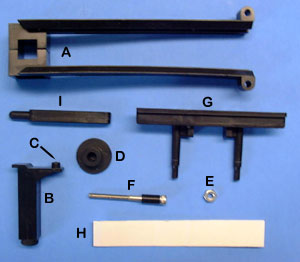
 |
Assembly
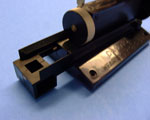
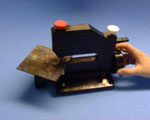
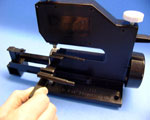
Place the main rail assembly (A) of the accessory on the cutter. There is a small guide rail on each side of the cutter body near the base of the unit. The track assembly slides onto these rails with the square block down. Note that if you purchased the ScoreOneEPlus, the rail and turntable are already installed, you can proceed to Scoring Circles below. |
|
 |
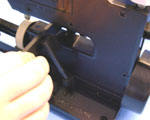
Locate the small hole (H) through the body of the cutter directly below the rubber drive wheel and insert the black handled adjusting screw (F) into this hole. Place the 8-32 hex nut (E) on the back side and tighten. This locks the assembly in position and determines the diameter of the circle. NOTE: Over-tightening the knob will only chew up the rails and cause damage. | |
 |
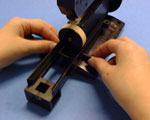
Next, press the turntable support (B) into the square opening at the front end of the rail assembly. For small circles, it should be inserted with the turntable bearing pin (C) toward the drive wheel. The distance between the cutter and center of the bearing pin is the circles radius. If your unit is set up on a surface grid, leave the rubber foot (K) off the bottom of the support post. | 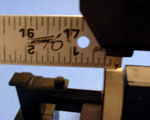 |
 |
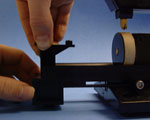
1) Cut a small 3/4" square from the adhesive tape strip (I). Locate the approximate center of your glass on the back side by drawing diagonals between the corners. When cutting large diameter circles, score and break off the corners so they fit in the throat of your machine. Remove the paper from one side of the adhesive square and apply it where the two lines intersect. |
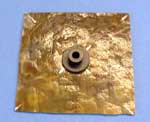 |
2) Peel the paper
from the other side and press the flat side of the turntable button (D) onto the tape. @ 3) Depress the lever raising the cutter head and slip the glass under the cutter wheel, placing the turntable onto the bearing pin (C). Keep holding the lever down as you slowly rotate the glass on the pin making sure it’s centered with a minimum of 1/2" of clearance. If not, start over and relocate the turntable. When centered, gently release the lever and lower the cutter head onto the glass. 4) Without touching the glass, turn the hand wheel and watch as you score a perfect circle. The wheel will end up right where it began and drop into the start of the score line. It may be helpful to steady larger pieces of glass being careful not to restrict its movement. |
 |
|
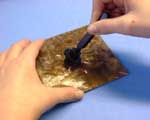 |
5) Depress the lever again and lift the glass and turntable off the support pin and remove it from the cutter. The plastic pry bar (J) is then inserted in the bearing hole at the bottom of the turntable and pressed sideways to remove it from the glass. Be careful to use slow, steady pressure to prevent cracking the glass. Your ScoreOneEGlass Cutter has completed its work. Now you must break out the circle from the surrounding glass. |
@
| Releasing
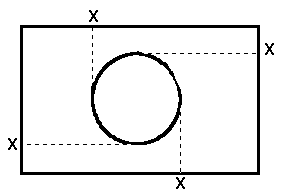
the Circle First you must "run" the score all around the circle. Place the glass with the score line side down onto a section of the newspaper. Use your thumb to press down gently on the back of the score line until it cracks. Keep pushing around the circle until the score is completely run. Next, make at least 4 radial cuts from the circle to the outer edge of the glass that extend from the edge of the circle but must NOT cross inside it. Use your running pliers at points "X" to break out the circle. |
|||
 |
 |
 |
|
 |
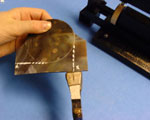
Strip Cutting
|
 |
Rotate it into position with the two round foot posts pointing down and away from the cutter head. Now, lift the guide and drop the feet into the round sockets at the back end of the main rails. |
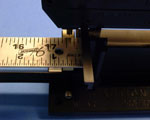 |
With the adjusting bolt loose, slide the assembly in or out until the cutter wheel is at the desired strip width. Tighten the adjusting knob. Raise cutter head and place glass against guide, with cutter head as close to the edge as possible then lower the cutter head onto the glass. |
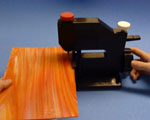 |
Turn the hand wheel with your right hand as you keep the strip snug against the guide with your left. When you reach the opposite edge of the glass, lift the head and remove the glass. Break the score to release the strip. |
Popular Accessories
Inland also produces the PowerKitsE/A> line
of benchtop tools, soldering irons, hand tools, diamond bits and core drills, accessories,
and work shop organizers.
Service
If you have any questions or comments regarding the use of this or any Inland product please call Inland Customer Service at 1-800-521-8428 9 AM to 5 PM EST., email us, or write us at:
|
Inland Craft Products, Co. 32052 Edward Madison Heights, MI 48071 |
Document No. 3000/QF/622 |
| If you don't see the navigation bar at the top of your screen, click on the above logo. | ||